The Vision Portal's Trips screen (accessible at  >> Trips) lists all the fleet trips reported by your Vision cameras during the selected time range, which by default is the last seven days (including the current day), with the most recent on top.
Note: Generally, trips will be included on the Trips page only if they are longer than one mile and include more than five minutes of travel time. The exceptions to this rule are trips that have a violation or a panic button capture; a trip will be generated as soon as one of these occurs.

To change the time period of shown trips, follow these steps:
- Click the Select Date Range calendar picker.

- You can select one of the common date ranges (such as Past 14 Days) by clicking it on the left.
To specify a custom range of dates, clicking the beginning and end days on the calendar. (You can use to move to the preceding month and
  to return the current month.)
- Click Search.
You can return trips for a certain bus or driver as follows:
- Click the Filter Type drop-down arrow and select either Driver or Asset (for a particular bus).

- Type the vehicle's or driver's name/number in the field to the right.
- Select the name/number in the drop-down list that appears.
- Click Search.
You can also filter by tag.
Note: If you select Include Trivial Trips and then click Search, short trips (shorter than one mile and fewer than five minutes long) will be added to the list.
To open the Trip Details window for a trip, click  in its row on the right.
The path the bus took will be displayed as a line on a map, and at the right will be a table showing all the violations for the trip and when they occurred.
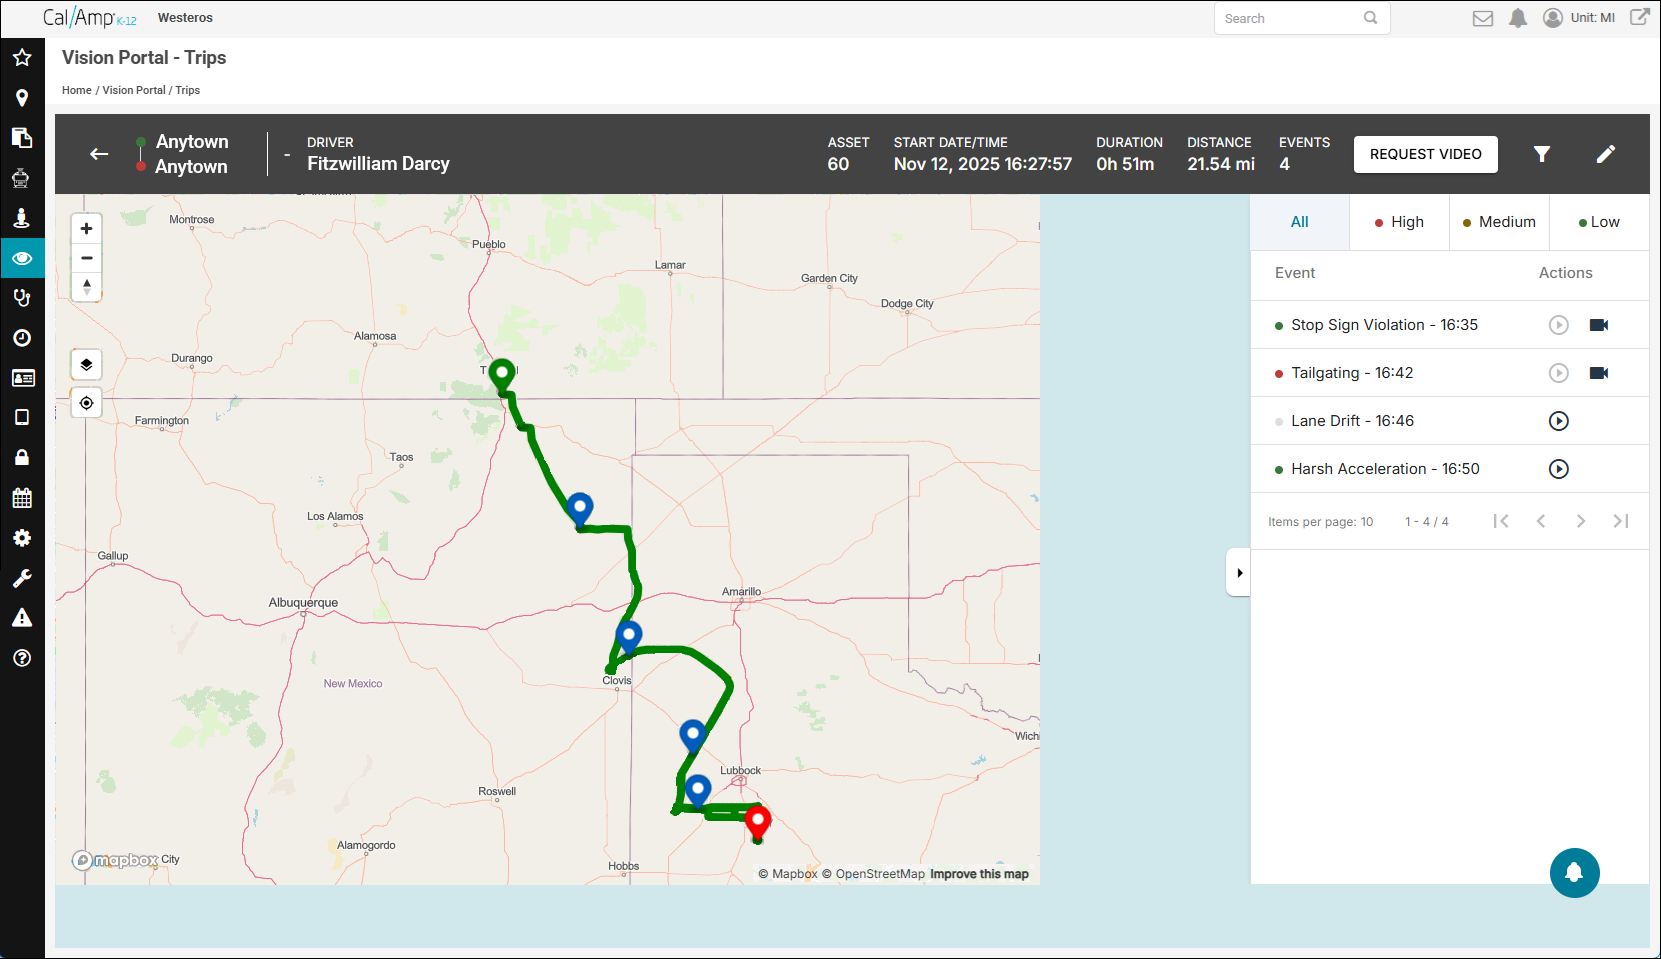
The green ( ) and red (
 ) map pins are the trip start and end locations. The blue (
 ) pins show where the events listed in the table on the right occurred. You can place your cursor over a pin to see its associated event.
To view an available video, click  in its row in the table.
If  appears in an event's row, you can click it to request a video for it (as one isn't readily available).
The table has four tabs, three of which show only events that fall in one level of violation severity (High, Medium, and Low). The default view is the All tab, which displays all the Vision infractions during the trip.
These are the options at the top right of the Trip Details window:
- Request Video: Opens the Request Video window.
Note: Video will not always be available. This depends on the device storage and how long ago the event occurred.
Follow these steps to request a video:
- Click and drag the handle to the beginning point on the timeline that you want to have a video of (
 will become
  as you drag).
The green line in the timeline is the starting point, and the blue lines are when the trip safety events occurred.
- Click the Video Format drop-down arrow and select the format for the video you want (such as Road + Driver).
- Click the Available Duration drop-down arrow and select the amount of time to include (such as 2 Minutes).
- Click the Video Resolution drop-down arrow and select the resolution you want (such as 320 x 180).
- Click Request Video.
The Confirm Request Settings dialog box will appear.

- If the settings are what you want, click Submit Video Request.
A success message will be displayed.

- You can click Go to Video Requests to see the status of your request. (See Requesting Videos and Viewing Requests Using the Vision Portal for details.)
- Click and drag the handle to the beginning point on the timeline that you want to have a video of (
 Trip Filter: Opens a list of all the Vision violations. You can select the check boxes of certain events if you want to see only those from the trip. (By default, all the violations will be included.)
 Edit Trip Details: Opens the Edit Trip window, which shows vehicle information, driver data, and tags.
In this, you can enter a different driver's name (and select the name from the resulting drop-down list) and add tags for the trip. Then click Save Details.
In the Trip List section of the Trips page, you will see these options at the top right and in the Action column:
 Refresh: Reloads the data on the screen, adding any new trips that have occurred since the last refresh.
- Bulk Edit: Opens the Bulk Trip Edit screen, in which you can reassign the driver to multiple trips.

- Export Options: Enables you to export trip data now or at a scheduled later time. This will send you an email with a link to download the CSV (comma-separated value) file.
 Request Video: Opens the Request Video/Trip Timeline window.
- View Trip Details: Opens the Trip Details window for the trip, as shown above.
 Edit Trip Details: Opens the Edit Trip window.
Note: The other tabs at the top of the Trips screen are Active Drivers and Manage. Active Drivers shows you a list of the operators who drove a trip in the selected time frame, and Manage provides logs of any bulk updates performed.